Download Shutter Encoder for PC
Convert, compress, and encode video, audio, and image files with professional-grade codecs. Powered by FFmpeg, built for editors and creators.
What Is Shutter Encoder?
A professional media converter built on FFmpeg that makes video, audio, and image encoding accessible to everyone — from hobbyists to post-production studios.
Professional Encoding Without the Complexity
Shutter Encoder wraps the full power of FFmpeg inside a clean graphical interface. Instead of memorizing command-line flags, you pick your source files, choose an output codec, adjust settings through dropdown menus and sliders, and hit start. The tool handles the rest.
Created by Paul Pacifico, a video editor who needed a faster way to transcode footage between editing suites, Shutter Encoder has grown into one of the most popular free converters for Windows, macOS, and Linux. It supports everything from basic MP4-to-MP3 conversions to professional-grade ProRes, DNxHD, and HEVC encoding at resolutions up to 8K.
The application handles more than just format conversion. You can trim clips, burn subtitles, add watermarks, adjust color levels, extract still frames, and even download web videos — all from one window. A built-in render queue lets you batch dozens of files with identical settings, which saves hours on repetitive tasks.
Shutter Encoder is open-source under GPL-3.0 and funded entirely through donations. There are no ads, no watermarks on output files, and no hidden feature locks. Every codec and filter ships with the installer.
Ready to get started? Download Shutter Encoder and start converting in minutes.
What Shutter Encoder can do
A single tool for converting, compressing, and editing media files across dozens of professional and consumer formats.
Multi-format conversion
Handles MP4, MOV, AVI, MKV, ProRes, DNxHD, RED, and many more. Audio formats too: WAV, AIFF, FLAC, MP3, AAC, AC3, OPUS. Image sequences like JPG and PNG are also supported. If FFmpeg can read it, Shutter Encoder can convert it.
Professional codecs
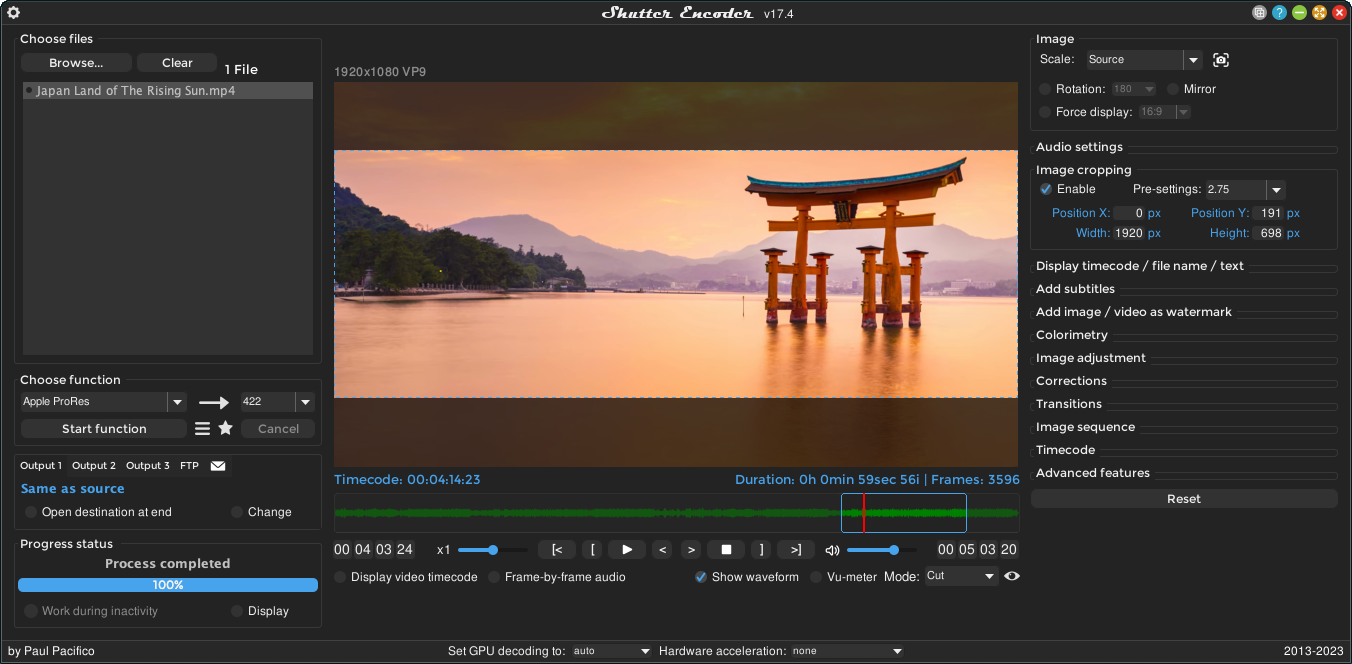
Encode to H.264, H.265/HEVC, VP9, ProRes, DNxHD/R, XAVC, and AVC-Intra. Supports resolutions up to 8K for broadcast and post-production workflows.
GPU-accelerated encoding
Uses NVIDIA NVENC, AMD AMF, and Intel Quick Sync to speed up encodes. Hardware acceleration cuts render times significantly on compatible systems.
Batch processing
Queue dozens of files with the same output settings and let them process unattended. Useful for overnight encodes or large project deliveries.
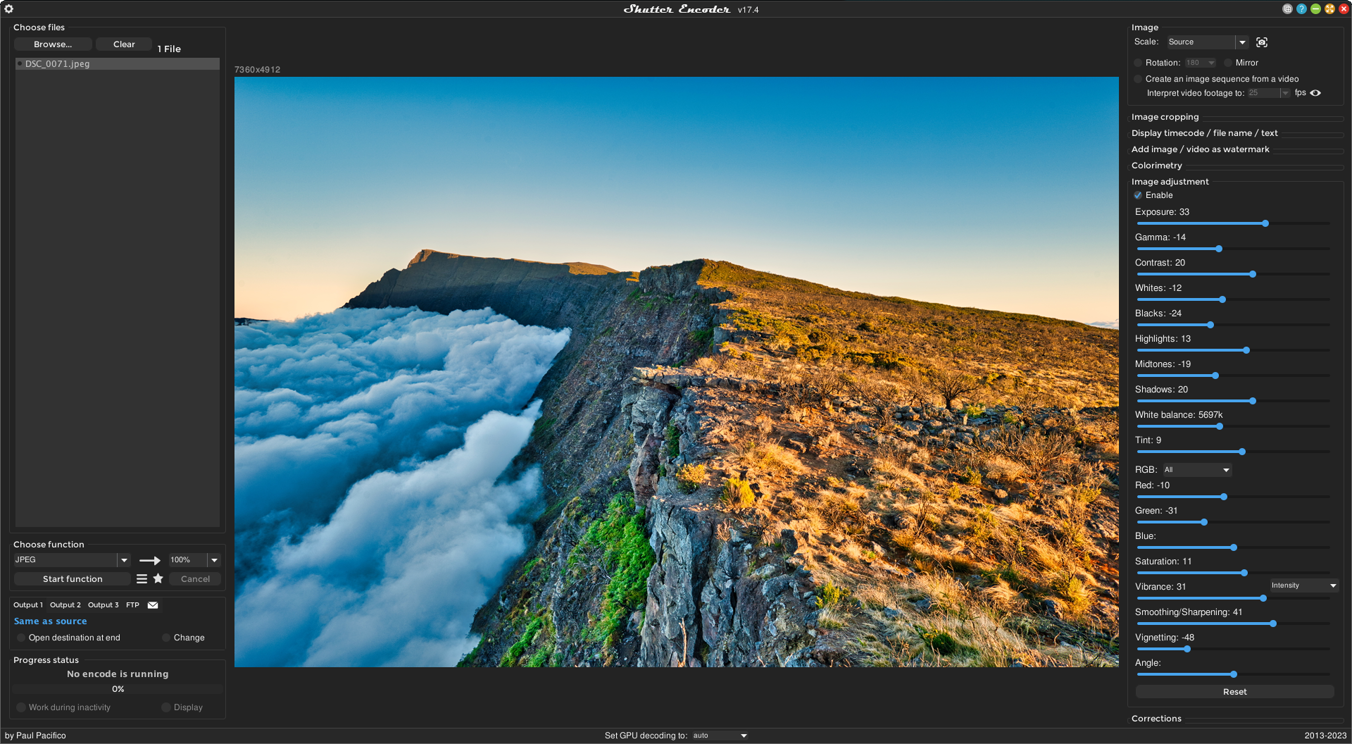
Trim, cut, and edit
Set in/out points to extract clips. Adjust color, add watermarks, burn in subtitles, and apply basic corrections before export.
Full audio toolkit
Convert between WAV, AIFF, FLAC, MP3, AAC, AC3, OPUS, and OGG. Extract audio tracks from video files, adjust levels, and output in the format your project needs. Works well for podcast producers who need quick format changes.
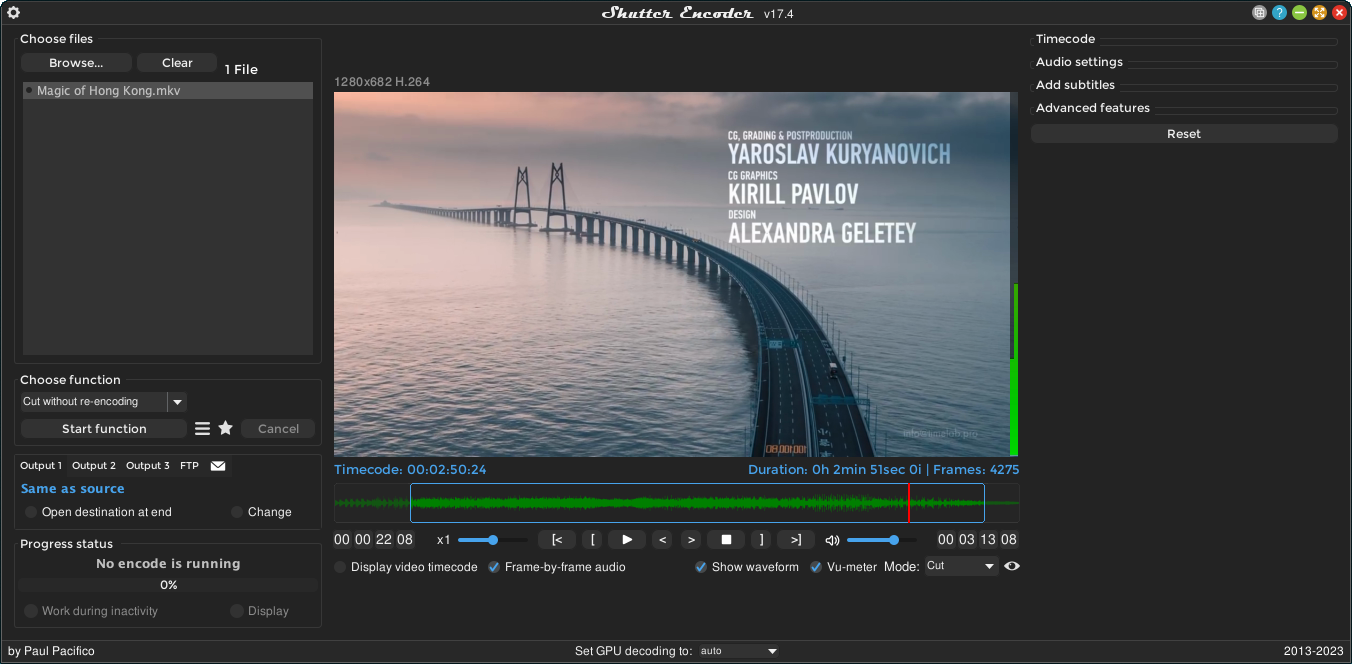
Rewrap without re-encoding
Change containers (MKV to MP4, for example) without touching the video or audio streams. Fast, lossless, and preserves original quality.
Built-in video downloader
Download videos from websites directly inside the app. Grab source files for archival or local editing without needing separate tools.
Screenshot extraction
Pull still frames from any video at specific timestamps or intervals. Handy for creating thumbnails, contact sheets, or reference images from footage.
Windows, macOS, and Linux
Runs natively on all three major desktop platforms. Same interface, same features, same output regardless of your operating system.
Built on FFmpeg. Open source under GPL-3.0. Download Shutter Encoder
Download Shutter Encoder
Get the latest release of Shutter Encoder for your operating system. Free, open-source, and ready to use right out of the box.
Shutter Encoder is a portable application on some platforms — no installation required. The Windows installer includes all FFmpeg dependencies. For portable use on Linux, download the TAR.GZ archive. If you run into issues, check the FAQ section or visit the GitHub issue tracker.
System Requirements
Shutter Encoder runs on any modern 64-bit system. GPU acceleration is optional but speeds up encoding significantly.
| Component | Minimum | Recommended |
|---|---|---|
| Operating System | Windows 10 (64-bit), macOS 10.15 Catalina, or Ubuntu 20.04 LTS | Windows 11, macOS 14 Sonoma, or Ubuntu 22.04 LTS |
| Processor (CPU) | Dual-core 64-bit CPU (Intel Core i3 or AMD Ryzen 3) | Quad-core or higher (Intel Core i7/i9 or AMD Ryzen 7/9) |
| RAM | 4 GB | 16 GB or more for 4K/8K workflows and AI tools |
| Disk Space | 500 MB for installation (~166 MB installer + runtime files) | 2 GB+ free space, SSD preferred for faster read/write during encoding |
| Display | 1280 x 720 resolution | 1920 x 1080 or higher |
| GPU (Optional) | Not required — CPU encoding works on all systems | NVIDIA (NVENC), AMD (AMF), or Intel (QSV) for hardware-accelerated encoding |
| Internet | Required only for initial download and the built-in video downloader | Broadband connection for downloading large source files |
Ready to get started? Download Shutter Encoder
Screenshots
A closer look at Shutter Encoder in action — from the main workspace to individual editing tools.

Screenshots from Shutter Encoder v19.9 running on Windows
Getting Started with Shutter Encoder
From download to your first encoded file in under ten minutes. This walkthrough covers installation, initial configuration, and a hands-on conversion example.
Downloading Shutter Encoder
Head to our download section above to grab the installer for your operating system. Shutter Encoder runs on Windows, macOS (Intel and Apple Silicon), and Linux.
For Windows, you will download a 64-bit EXE installer weighing about 166 MB. macOS users pick between an Intel or Apple Silicon PKG file (roughly 180 MB). On Linux, choose a .deb package for Ubuntu/Debian or use the AppImage for other distributions.
Which version should you pick?
Stick with the latest stable release (currently v19.9, released February 2026). There is no separate beta channel for Shutter Encoder — Paul Pacifico publishes tested builds directly on the official site and GitHub. If you run a 32-bit operating system, note that Shutter Encoder only supports 64-bit. Time to upgrade, or look for an older release on the GitHub releases page.
Installation Walkthrough
Windows
- Double-click the downloaded Shutter Encoder.exe file. If Windows SmartScreen pops up saying “Windows protected your PC,” click More info, then Run anyway. The app is open-source and safe, but SmartScreen flags anything without a paid code-signing certificate.
- The installer opens with a language selector. Pick your language and hit OK.
- Accept the license agreement (GPL-3.0) and click Next.
- Choose the install folder. The default (
C:Program FilesShutter Encoder) works fine for most setups. - On the components screen, leave all boxes checked. The optional desktop shortcut is handy.
- Click Install and wait about 30 seconds. Click Finish.
macOS
- Open the downloaded .pkg file. macOS Gatekeeper may block it because the app is from an “unidentified developer.” Right-click the file, choose Open, then confirm in the dialog that appears.
- Follow the installer prompts — accept the license, choose your disk, and click Install.
- After installation, find Shutter Encoder in your Applications folder. The first launch may take a few extra seconds while macOS verifies the app.
Linux
For Ubuntu or Debian-based systems, open a terminal and run:
sudo dpkg -i ShutterEncoder.deb
sudo apt install -f
The apt install -f command resolves any missing dependencies. For other distributions, the AppImage is the simplest option:
./ShutterEncoder.AppImage
No installation required with AppImage — it runs as a self-contained portable app.
Initial Setup and Configuration
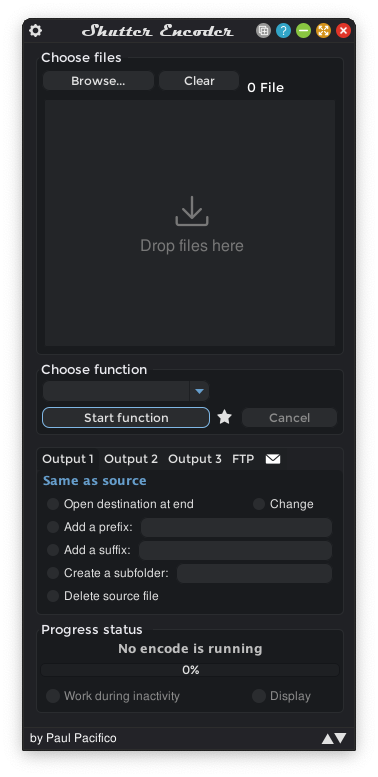
When Shutter Encoder launches for the first time, you land directly on the main workspace. There is no signup, no registration, no activation key. The interface shows a drag-and-drop zone at the top, a function/codec selector in the middle, and encoding settings below.
Settings worth adjusting right away
Click the gear icon () in the bottom-right corner of the window to open the Settings panel. Here are the ones that matter most:
- Language — Defaults to your OS language. Switch to English (or your preferred language) here.
- Threads — Set to the number of CPU cores you want to use. The default uses all cores, which is usually fine. Drop it to half if you need to multitask while encoding.
- GPU acceleration — If you have an NVIDIA, AMD, or Intel GPU, Shutter Encoder auto-detects it. The status bar at the bottom shows whether hardware decoding is active. Leave this on “Auto” unless you run into compatibility issues.
- Default output folder — By default, encoded files land in the same folder as the source. Change this to a dedicated output folder (like
D:Encoded) to keep things organized. - Disable update check — If you prefer manual updates, uncheck this. Otherwise, Shutter Encoder notifies you on launch when a new version is available.
File associations are optional. Shutter Encoder works best as a standalone tool rather than a default media player. Drag files into it when you need them converted instead of associating file types.
Your First Conversion
Let’s convert a video to H.265 (HEVC) — one of the most common tasks. H.265 produces smaller files than H.264 at the same quality, which is why editors and content creators use it for archiving footage.
- Add files. Drag one or more video files into the file list area at the top of the window. You can also click “Browse” to navigate to your files. Shutter Encoder accepts nearly every format: MP4, MOV, AVI, MKV, ProRes, and more.
- Pick your codec. In the “Choose function” dropdown below the file list, select H.265. The settings panel updates to show H.265-specific options.
- Set the bitrate. For 1080p footage, a VBR (variable bitrate) of around 8-12 Mbps produces good quality at a reasonable file size. For 4K, try 20-30 Mbps. If you are unsure, the default values are sensible starting points.
- Trim if needed. Right-click any file in the list and select “Open in player” (or press Space). In the preview window, set In and Out points with the I and O keys to encode only a portion of the video.
- Start encoding. Click the Start function button at the bottom. A progress bar appears, showing elapsed time, estimated time remaining, and current frame rate. The console log (click the terminal icon) shows the raw FFmpeg output if you want to monitor details.
Once complete, your encoded file appears in the output folder. Right-click the file in the list and select Open output folder to find it.
Batch processing multiple files
Instead of clicking “Start function” after each file, click Add to render queue (the queue icon next to the start button). Set up different codecs or settings for each batch, then process them all at once. Shutter Encoder handles the queue sequentially, and you can monitor progress in the queue panel.
Useful keyboard shortcuts
| Action | Windows / Linux | macOS |
|---|---|---|
| Save preset | Ctrl+S | Cmd+S |
| Open file browser | Ctrl+O | Cmd+O |
| Set In point (player) | I | I |
| Set Out point (player) | O | O |
| Play / Pause (player) | Space | Space |
Tips, Tricks, and Best Practices
Speed up your encodes
If your GPU supports hardware encoding (NVENC for NVIDIA, AMF for AMD, QSV for Intel), Shutter Encoder uses it automatically when you select a compatible codec like H.264 or H.265. The status bar at the bottom of the window shows “GPU Acceleration Active” when it is working. Hardware encoding is 3-5x faster than CPU-only, though the file size may be slightly larger at the same quality setting.
Mistakes to avoid early on
- Re-encoding when you only need to change containers. If you want to turn a .mov file into .mp4 without changing quality, use the “Rewrap” function instead of a full re-encode. It finishes in seconds and does not lose a single frame of quality.
- Ignoring the render queue. Encoding five files one at a time is tedious. Queue them up and walk away.
- Setting bitrate too low for 4K footage. Below 15 Mbps, 4K H.265 starts showing compression artifacts. Stick to 20+ Mbps for 4K, 8+ Mbps for 1080p.
Features worth exploring
Built-in video downloader: Select “Web video” from the function dropdown, paste a URL, and Shutter Encoder pulls the video. Handy for saving reference material from online sources.
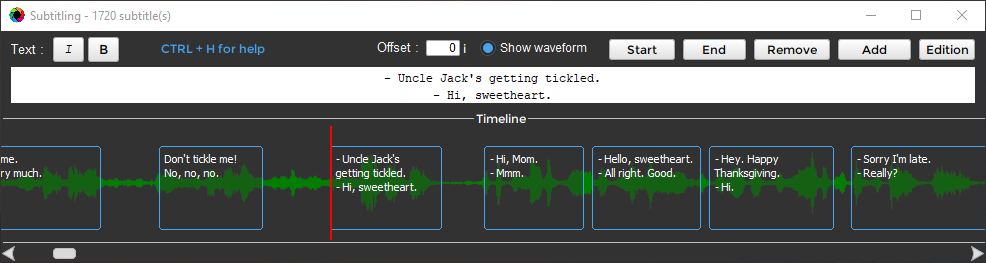
Subtitle burning: Drag an .srt file alongside your video and Shutter Encoder auto-detects it. Select “Burn subtitles” in the subtitle settings to hardcode them into the video.
Image sequence export: The “JPEG” or “PNG” function extracts every frame (or every Nth frame) as individual images. Useful for creating thumbnails, stop-motion analysis, or feeding frames into other tools.
Loudness analysis: Under “Analysis,” pick “Loudness & True Peak” to check your audio levels against broadcast standards like EBU R128 or ATSC A/85. Essential for anyone delivering content to TV or streaming platforms.
Ready to convert your first file? Grab the installer and get encoding.
Download Shutter EncoderFrequently Asked Questions
Answers to common questions about downloading, installing, and using Shutter Encoder for video conversion and encoding.
Is Shutter Encoder safe to download and install?
Yes, Shutter Encoder is 100% safe to download when you get it from the official source. The software is open-source under the GPL-3.0 license, with its full source code available on GitHub at paulpacifico/shutter-encoder. Over 2.7 million users have downloaded it without a single confirmed malware incident from the official distribution.
The installer (approximately 166 MB for Windows 64-bit, version 19.9) has been scanned by major antivirus engines on VirusTotal and consistently comes back clean. Some users report occasional false positives from heuristic scanners, particularly with the compressed portable ZIP version. This happens because the executable bundles FFmpeg binaries and Java runtime components, which can trigger generic detection rules. Paul Pacifico, the developer, has confirmed on Reddit that these are false positives.
- Download only from the official website at shutterencoder.com or from trusted mirrors like VideoHelp, MajorGeeks, and OlderGeeks
- Avoid third-party download sites like Softonic or CNET that may bundle adware with the installer
- If Windows SmartScreen shows a warning, click “More info” then “Run anyway” – this happens because the app is not code-signed with an EV certificate
- On macOS, right-click the app and select “Open” to bypass Gatekeeper on first launch
Pro tip: Use the portable ZIP version if you want to verify the contents before running anything. You can extract it, scan the folder with your antivirus, and run the executable directly without a system-wide installation.
For more details on what you get with the download, visit our download section.
Where is the official safe download for Shutter Encoder?
The official download page is at shutterencoder.com, maintained directly by the developer Paul Pacifico. This is the only source guaranteed to provide unmodified, clean installers for all platforms.
Version 19.9 (released February 8, 2026) is the latest stable release. The official site provides separate downloads for Windows 64-bit (EXE installer and portable ZIP), macOS (Intel and Apple Silicon builds), and Linux (DEB package and portable tarball). Each file is approximately 166 MB for Windows, with slightly different sizes for other platforms. The developer also hosts older versions in an archive directory if you need a previous release for compatibility reasons.
- Primary source: shutterencoder.com/en/ – always the latest version
- GitHub releases: github.com/paulpacifico/shutter-encoder – source code and release binaries
- Trusted mirrors: VideoHelp, Softpedia, MajorGeeks, and Gizmodo all link to official builds
- Linux users can also find it on the AUR (Arch User Repository) as
shutter-encoderorshutter-encoder-bin
Pro tip: Bookmark the official download page directly. Search engine results for “Shutter Encoder download” sometimes surface clone sites or ad-heavy wrappers that rebundle the installer with unwanted extras.
You can also grab the latest version from our download section, which links directly to the official sources.
Does Shutter Encoder work on Windows 11?
Yes, Shutter Encoder works on Windows 11 without any issues. The application has been tested and runs on Windows 7 through Windows 11, including the latest 24H2 update. Version 19.9 is fully compatible with Windows 11 on both x64 and ARM64 processors.
The Windows 64-bit installer is the recommended download for most users. It requires approximately 500 MB of disk space after installation and runs as a standard desktop application. Since Shutter Encoder is built on Java with FFmpeg as its processing engine, it works on any Windows version that supports a 64-bit JRE. Some users on the r/shutterencoder subreddit have reported that the app needs to be installed on the C: drive to launch properly – if you see the splash screen but the app never opens, try installing it to C:Program Files instead of a secondary drive.
- Windows 11 (all versions including Home, Pro, Enterprise) – fully supported
- Windows 10 (version 1809 and later) – fully supported
- Windows 7/8/8.1 – works but no longer officially tested
- ARM64 Windows – runs through x64 emulation with no known problems
Pro tip: If you are running Windows 11 with Controlled Folder Access enabled in Windows Security, add Shutter Encoder to the allowed apps list. Without this, the app may fail to write output files to protected directories like Documents or Desktop.
Check our system requirements for full hardware specifications.
Does Shutter Encoder work on Mac and Linux?
Yes, Shutter Encoder runs natively on macOS and Linux alongside Windows. All three platforms receive the same features and updates simultaneously with each new release.
On macOS, version 19.9 supports macOS 10.13 High Sierra and newer, with dedicated builds for Intel (x86_64) and Apple Silicon (M1, M2, M3, M4). The macOS download is a PKG installer or portable ZIP, each around 140-160 MB depending on architecture. On first launch, macOS Gatekeeper will block the app since it is not signed through the Apple Developer Program. Right-click the application in Finder and select “Open” to grant permission. On Linux, the developer provides a .deb package for Ubuntu/Debian-based distributions and an AppImage for universal compatibility. Arch Linux users can install from the AUR. The app depends on FFmpeg and ALSA audio libraries.
- macOS: Intel and Apple Silicon builds available separately – pick the right one for your Mac
- Ubuntu/Debian: Download the .deb package and install with
sudo dpkg -i shutter-encoder*.deb - Arch Linux: Install from AUR with
yay -S shutter-encoder-bin - Other Linux: Use the portable tarball or AppImage – extract and run, no installation needed
Pro tip: On Linux, if GPU hardware acceleration is not detected, check that your NVIDIA or AMD drivers include the VAAPI or NVENC libraries. The status bar at the bottom of Shutter Encoder shows whether GPU decoding is active.
See all available platform downloads on our download page.
What are the minimum system requirements for Shutter Encoder?
Shutter Encoder requires a 64-bit operating system, a dual-core processor, and at least 2 GB of RAM. These are the bare minimums – for smooth 4K encoding, you will want significantly more horsepower.
The installed application takes about 500 MB of disk space. During encoding, temporary files can consume additional storage depending on the input file size and output format. A typical 1-hour 1080p H.265 encode produces a temporary file of 2-4 GB before the final output is written. For hardware-accelerated encoding with GPU support, you need an NVIDIA GPU with NVENC (GTX 600 series or newer), an AMD GPU with AMF (RX 400 series or newer), or an Intel CPU with Quick Sync (6th gen Core or newer).
- Minimum: Dual-core CPU (2 GHz+), 2 GB RAM, 500 MB free disk space, 64-bit OS
- Recommended for 1080p: Quad-core CPU, 8 GB RAM, SSD storage, dedicated GPU
- Recommended for 4K/8K: 8+ core CPU (Ryzen 7 / i7 or better), 16-32 GB RAM, NVMe SSD, GPU with NVENC or AMF
- Internet: Not required for encoding – only needed to download the app and check for updates
Pro tip: Set the thread count in Shutter Encoder to 0 (the default) for maximum performance. If encoding makes your system unresponsive, set it to your core count minus 2 – for example, set to 6 on an 8-core CPU. You can find this option in the advanced settings panel.
View the full specifications table on our system requirements page.
Is Shutter Encoder completely free to use?
Yes, Shutter Encoder is 100% free with no restrictions, no trial period, and no feature locks. Every function in the application is available to all users from the moment you install it.
The software is released under the GNU General Public License v3.0 (GPL-3.0), which means the source code is publicly available and anyone can inspect, modify, or redistribute it. There is no “Pro” or “Premium” tier. The developer, Paul Pacifico, funds ongoing development through voluntary donations. The official website has a PayPal donation button, but donating is entirely optional and does not unlock any additional features. Unlike some free video converters that add watermarks, limit output resolution, or cap file sizes, Shutter Encoder imposes zero restrictions on any encoding parameter.
- No watermarks on output files – ever
- No resolution limits – encode from 480p to 8K without restrictions
- No file size caps – process files of any size
- No batch processing limits – queue as many files as your hardware can handle
- No ads or sponsored prompts inside the application
Pro tip: If you find Shutter Encoder useful, consider supporting the developer through a one-time donation on the official site. The entire project is maintained by a single developer, and even a small contribution helps keep development active.
See all the capabilities included for free on our features page.
Is Shutter Encoder open source and what license does it use?
Shutter Encoder is fully open source under the GPL-3.0 license. The complete source code is hosted on GitHub at github.com/paulpacifico/shutter-encoder, where anyone can review every line of code that goes into each release.
The GPL-3.0 license gives you the freedom to use, study, modify, and share the software without restrictions. If you modify the code and distribute your own version, you must also release it under the GPL-3.0 license. The project is written primarily in Java, with FFmpeg handling the actual encoding work under the hood. As of version 19.9, the repository has accumulated thousands of commits from the developer. The GitHub Issues page serves as the primary bug tracker and feature request system, with Paul Pacifico responding to reports regularly. Community contributions are accepted through pull requests.
- License: GPL-3.0 – free for personal and commercial use
- Source code: github.com/paulpacifico/shutter-encoder
- Language: Java (GUI) + FFmpeg (encoding engine)
- Bug reports and feature requests: GitHub Issues
Pro tip: If you are a developer and want to build Shutter Encoder from source, clone the repository and follow the build instructions in the README. Building from source lets you add custom FFmpeg flags or codec support that the standard distribution does not include.
Learn more about the technology behind the app on our overview section.
How do I download and install Shutter Encoder step by step?
Installing Shutter Encoder takes about 2 minutes. Download the installer from the official site, run it, and the application is ready to use with no configuration required.
The Windows installer (Shutter Encoder 19.9 Windows 64bits.exe, approximately 166 MB) is a standard setup wizard. There are no bundled toolbars, no browser extensions, and no “recommended” third-party software to decline. The installer places the application in Program Files and creates a Start Menu shortcut. On macOS, download the PKG file matching your processor (Intel or Apple Silicon), double-click to install, then drag Shutter Encoder to your Applications folder.
- Visit our download section and click the download button for your operating system
- Run the downloaded installer – on Windows, if SmartScreen appears, click “More info” then “Run anyway”
- Follow the installer prompts – the default installation path (C:Program FilesShutter Encoder) works best
- Launch Shutter Encoder from the Start Menu or desktop shortcut
- On first launch, the application loads FFmpeg binaries and initializes GPU detection – this takes 5-10 seconds
Pro tip: Install Shutter Encoder on your fastest drive (ideally an SSD or NVMe). The application reads and writes large temporary files during encoding, and drive speed directly affects conversion time. Avoid installing on network drives or USB sticks.
For a detailed walkthrough with screenshots, see our Getting Started guide.
Shutter Encoder portable vs installer – which version should I choose?
Choose the portable version if you want to run Shutter Encoder from a USB drive or avoid modifying your system. Choose the installer if you want Start Menu integration and automatic file associations.
Both versions contain the exact same application with identical features. The portable version is a ZIP file (around 166 MB compressed) that you extract to any folder and run directly – it stores all settings in its own directory and leaves no traces in the Windows registry. The installer version writes to Program Files, creates registry entries, and adds shortcuts. On Reddit, users in r/shutterencoder have confirmed there are no performance differences between the two versions. The portable version is popular among video editors who work on multiple machines, since you can carry it on an external drive with your project files.
- Portable: No installation required, no admin rights needed, runs from any folder, settings stored locally
- Installer: Start Menu shortcut, desktop icon, cleaner uninstall through Add/Remove Programs
- Same features: Both versions include FFmpeg, GPU acceleration, all codecs, batch processing
- Recommendation: Use the installer for your main workstation, portable for USB or secondary machines
Pro tip: If you use the portable version, create a “Presets” subfolder next to the executable and save your encoding presets there. When you copy the folder to a new machine, all your custom presets travel with it.
Download either version from our download section.
How to fix Shutter Encoder not opening or crashing on startup?
If Shutter Encoder shows the splash screen but never opens, the most common fix is installing it on your C: drive. Multiple users on Reddit have confirmed that the app fails to launch when installed on secondary drives (D:, E:, etc.).
This startup issue is typically caused by the bundled Java runtime not finding its dependencies when the installation path contains certain characters or is on a non-system drive. On Windows 11, another common cause is antivirus software (particularly Windows Defender) quarantining FFmpeg binaries during installation. The app will appear to start but hang because the encoding engine is missing. On macOS, the app may get stuck on the logo screen if Gatekeeper has not fully approved it – try restarting your Mac and opening the app again.
- Uninstall Shutter Encoder completely from its current location
- Reinstall to C:Program FilesShutter Encoder (not D: or another partition)
- Check Windows Defender quarantine – go to Windows Security > Virus & Threat Protection > Protection History and restore any Shutter Encoder files
- If it still fails, try the portable ZIP version – extract to C:ShutterEncoder and run directly
- As a last resort, delete the settings folder at %APPDATA%Shutter Encoder and relaunch for a clean start
Pro tip: If the application hangs mid-conversion with no response, open Task Manager and look for multiple “Shutter Encoder” or “ffmpeg.exe” processes. Kill them all with taskkill /F /IM "shutter encoder*" /T in Command Prompt, then relaunch.
For step-by-step installation instructions, see our Getting Started guide.
Why is Shutter Encoder encoding slowly and how can I speed it up?
Slow encoding is almost always caused by not using GPU hardware acceleration. Enabling NVENC (NVIDIA), AMF (AMD), or Quick Sync (Intel) can speed up H.264 and H.265 encoding by 3-10x compared to CPU-only processing.
Check the status bar at the bottom of the Shutter Encoder window. If it says “GPU decoding: disabled” or shows no GPU activity, you are encoding entirely on the CPU. For a 1080p H.265 encode, CPU-only processing on a modern 8-core processor takes roughly 0.5-1x real-time speed, while NVENC on a GTX 1060 or newer achieves 3-5x real-time. The speed difference is even more dramatic at 4K, where GPU encoding can be 8-10x faster. Note that GPU acceleration only works with specific codecs: H.264, H.265, VP9, AV1, MPEG-1, and MPEG-2. For other codecs like ProRes or DNxHD, the CPU handles all processing regardless of GPU settings.
- Enable GPU encoding in the status bar dropdown at the bottom of the main window
- For best quality at low bitrates, enable “Max. Quality” and select 2-pass encoding
- Use Lanczos scaling if you are resizing video – it is slower but produces noticeably sharper output
- Set thread count to 0 (default) to let FFmpeg use all available CPU cores
- Avoid applying filters (color correction, stabilization) when GPU encoding – filters force CPU processing and negate the speed benefit
Pro tip: If you only need to change the container format (for example, MOV to MP4) without changing the codec, use the “Rewrap” function instead of re-encoding. Rewrap copies the existing video and audio streams into a new container in seconds, regardless of file size.
See all encoding options in our features overview.
Shutter Encoder encoding fails or produces incomplete output files – how to fix?
Failed or incomplete encodes are usually caused by incompatible encoding settings, insufficient disk space, or a conflict between GPU acceleration and the selected codec. Right-click the progress bar during encoding to open the console log, which shows the exact FFmpeg error.
The most frequently reported issue on GitHub and Reddit involves 2-pass H.265 encoding with audio set to “copy” when trimming a segment of a video. The encoder completes the first pass but hangs indefinitely on the second pass. This happens because the trimmed segment boundaries do not align with keyframes, causing FFmpeg to loop at the last frame. Another common cause is selecting a GPU encoder (like NVENC H.265) when your GPU does not support the specific profile or resolution – the encode starts and immediately fails without a visible error unless you check the console.
- Right-click the progress bar to open the FFmpeg console log and read the error message
- If 2-pass encoding hangs, switch to 1-pass or CRF-based encoding as a workaround
- If using audio “copy” with trimming, switch to re-encoding audio (AAC or FLAC) instead
- Check free disk space – FFmpeg needs room for temporary files, especially during 2-pass encoding
- If GPU encoding fails silently, set hardware acceleration to “auto” or “none” in the status bar and retry
Pro tip: Before encoding a large batch of files, test your settings on a single short clip first. If the test encode completes without errors, the same settings should work for the full batch. This saves hours of waiting only to discover a configuration problem.
For encoding tips and setup guidance, visit our Getting Started section.
How do I update Shutter Encoder to the latest version?
Shutter Encoder checks for updates automatically on startup. When a new version is available, it displays a notification with a link to download the update. There is no built-in auto-updater that patches the application in place – you download and install the new version manually.
Version 19.9 (released February 8, 2026) is the current latest release. Updates typically arrive every 4-8 weeks, with each release adding new codecs, fixing bugs, or improving performance. The developer posts changelogs on the official website and on r/shutterencoder. New versions install over the old version without losing your custom presets or settings. If you use the portable version, download the new ZIP, extract it to a fresh folder, and copy your presets from the old installation.
- Launch Shutter Encoder – if a new version is available, you will see a notification dialog
- Click the link in the notification to open the download page in your browser
- Download the latest installer or portable ZIP for your platform
- Run the installer over your existing installation – your presets and settings are preserved
Pro tip: Subscribe to the r/shutterencoder subreddit or watch the GitHub repository to get notified about new releases as soon as they drop. Major updates sometimes change FFmpeg versions, which can affect encoding behavior – reading the changelog before updating saves troubleshooting time.
Grab the latest version from our download section.
What is new in the latest version of Shutter Encoder?
Version 19.9, released on February 8, 2026, is the latest stable release. Each update typically includes new codec support, bug fixes, FFmpeg engine upgrades, and user interface improvements.
Shutter Encoder follows an active development cycle with Paul Pacifico pushing updates roughly once a month. Recent versions in the 19.x series have added expanded AV1 encoding support through libsvtav1, improved GPU detection for newer NVIDIA RTX 40-series and AMD RDNA 3 cards, and refined the batch processing queue for handling hundreds of files without memory leaks. The AI-powered features (introduced in later 18.x builds) have also been refined, including automated scene detection and smart cropping. The changelog for each version is published on the official website under the documentation section.
- AV1 encoding improvements with SVT-AV1 for better compression at low bitrates
- Updated FFmpeg engine with the latest codec libraries and bug fixes
- Improved hardware acceleration detection and stability for newer GPUs
- User interface refinements and bug fixes reported through GitHub Issues
Pro tip: If a new version introduces a regression that breaks your workflow, the official site maintains an archive of all previous versions at shutterencoder.com/old%20versions/. You can roll back to any prior release while waiting for a fix.
Check out all the capabilities on our features page.
How do I convert a video to MP4 or H.265 using Shutter Encoder?
Drag your video file into Shutter Encoder, select H.265 (or H.264) from the codec dropdown, adjust your output settings, and click Start. The entire process takes a few clicks.
Shutter Encoder accepts virtually any input format – MOV, AVI, MKV, WebM, ProRes, raw camera files, and dozens more. When you select H.265 as the output codec, the default settings produce a high-quality MP4 file suitable for playback on most devices. For web uploads (YouTube, Vimeo), H.264 at CRF 18-23 is the standard recommendation. For archival or maximum compression, H.265 at CRF 20-28 delivers 30-50% smaller files than H.264 at equivalent visual quality. The bitrate, resolution, audio codec, and container format are all configurable from the main interface.
- Drag and drop your source video into the file list area at the top of the window
- Select “H.265” from the function/codec dropdown (or “H.264” for broader compatibility)
- Set your desired resolution, bitrate, or CRF value in the settings panel
- Choose an output folder or leave the default (same folder as input)
- Click “Start” and monitor progress in the progress bar
Pro tip: For the best balance of quality and file size, use CRF mode (Constant Rate Factor) instead of fixed bitrate. CRF 20 for H.265 and CRF 18 for H.264 are good starting points that produce visually lossless output for most content.
Read our complete Getting Started guide for a detailed conversion walkthrough.
Can Shutter Encoder batch convert multiple files at once?
Yes, batch conversion is one of Shutter Encoder’s strongest features. Drag multiple files (or an entire folder) into the file list, configure your output settings once, and click Start to process them all sequentially.
The application processes files one at a time from the queue, applying identical encoding settings to each file. This is ideal for converting a folder of camera footage (say, 50 MTS files from a Panasonic camera) into H.264 MP4 files for editing. You can also use the “Watch folder” function to monitor a directory and automatically encode any new files that appear – useful for post-production pipelines where files arrive from a render farm or camera ingest station. The queue can hold hundreds of files without issues, and progress is tracked individually for each file.
- Drag a folder or select multiple files (Ctrl+A in the file browser) to add them to the queue
- All files in the batch receive the same output codec, resolution, and quality settings
- Use “Watch folder” in advanced settings for automated processing of new files
- Output files are named based on the source filename with the new extension
- Enable “Delete source file” in advanced settings if you want to remove originals after successful conversion
Pro tip: Set up to 3 simultaneous output destinations in Shutter Encoder. For example, encode to H.264 for web delivery, ProRes for editing, and a low-res proxy all from the same batch run – saving you from processing the same files three times.
Explore batch processing and other capabilities on our features page.
Shutter Encoder vs HandBrake – which video converter is better?
Both are free and open-source, but they serve different workflows. HandBrake is better for simple format conversion with presets, while Shutter Encoder offers more tools for editing, trimming, and professional codecs.
HandBrake focuses on encoding raw or disc sources into MP4, MKV, or WebM using a curated set of presets. It is excellent for DVD ripping and quick compression jobs. Shutter Encoder provides a wider set of output formats (ProRes, DNxHD/R, XDCAM, AVC-Intra, OP-Atom for Avid) and includes built-in tools that HandBrake lacks: lossless trim/cut without re-encoding, video stabilization, LUT color grading, audio normalization, subtitle burning, and a web video downloader. In Reddit encoding speed tests (r/handbrake, r/shutterencoder), Shutter Encoder with NVENC H.265 completed encodes 2x faster than HandBrake with the same NVENC settings on the same hardware. HandBrake has a slight edge in quality optimization at very low bitrates thanks to its fine-tuned x265 presets.
- Choose HandBrake if: You need simple compression with presets, DVD/Blu-ray ripping, or are a beginner who wants minimal settings
- Choose Shutter Encoder if: You work with professional codecs (ProRes, DNxHD), need batch processing with editing tools, or want faster GPU encoding
- Output formats: HandBrake supports MP4/MKV/WebM only. Shutter Encoder supports 30+ output formats including professional broadcast standards
- Extra tools: Shutter Encoder includes cut, merge, stabilize, normalize audio, download web videos. HandBrake does not.
Pro tip: You do not have to pick just one. Many video editors keep both installed – HandBrake for quick one-click presets and Shutter Encoder for everything else. They can coexist on the same system without conflicts.
See the full feature list on our features page.
Does Shutter Encoder support hardware-accelerated GPU encoding?
Yes, Shutter Encoder supports GPU-accelerated encoding through NVIDIA NVENC, AMD AMF, and Intel Quick Sync Video. Enable it from the status bar dropdown at the bottom of the main window.
GPU acceleration works for specific codecs only: H.264, H.265/HEVC, VP8, VP9, AV1, MPEG-1, and MPEG-2. If your input file uses a different codec, the GPU decoding option will still work but the encoding falls back to CPU. NVIDIA NVENC is the most widely used option and supports GPUs from the GTX 600 series onward. AMD AMF works with RX 400+ cards. Intel Quick Sync requires 6th generation Core processors or newer. The GPU handles encoding while the CPU handles demuxing, audio processing, and any applied filters – so both CPU and GPU are utilized during conversion.
- NVIDIA NVENC: GTX 600+, RTX series fully supported. Best performance with RTX 3060+ for HEVC
- AMD AMF: RX 400+, RX 7000 series for AV1 hardware encoding
- Intel Quick Sync: 6th gen Core+, works on integrated graphics even without a dedicated GPU
- GPU decoding: Separate option that offloads input decoding to GPU – helps most with H.264/H.265 sources
Pro tip: When using GPU encoding without any filters or color corrections, also enable GPU decoding in the status bar. This keeps the entire video pipeline on the GPU and reduces CPU usage to near zero. But if you apply filters like stabilization or LUTs, keep GPU decoding off – mixing GPU decode with CPU filters actually slows things down.
Check GPU compatibility in our system requirements.
Can Shutter Encoder download videos from websites?
Yes, Shutter Encoder includes a built-in video downloader powered by yt-dlp that can grab videos from hundreds of supported websites. Select the “Web video” function from the codec dropdown and paste a URL to get started.
The downloader supports YouTube, Vimeo, Dailymotion, Twitter/X, Reddit, and many other platforms. It detects all available quality options (resolution, codec, audio track) and lets you choose which one to download. You can download video only, audio only, or both together. The downloaded file can then be immediately converted to another format using the same Shutter Encoder interface – download from YouTube in WebM, convert to MP4 in one workflow. The built-in yt-dlp is updated with each Shutter Encoder release to maintain compatibility with platform changes.
- Switch to the “Web video” function in the codec/function dropdown
- Paste the video URL into the URL field that appears
- Select your preferred quality and format from the detected options
- Click Start to download – the file saves to your configured output folder
Pro tip: If a download fails or returns a low-quality version, update Shutter Encoder to the latest release. Websites frequently change their streaming formats, and yt-dlp updates in newer versions fix these compatibility breaks. If you need to download an entire playlist, paste the playlist URL – Shutter Encoder will queue all videos automatically.
Discover all available functions on our features page.
Still have questions? Visit the r/shutterencoder community or check the GitHub Issues page.